> ## Documentation Index
> Fetch the complete documentation index at: https://browsertools.agentdesk.ai/llms.txt
> Use this file to discover all available pages before exploring further.
# Installation
> BrowserTools embeds AI code editors and agents directly into your web browser
## Getting Started
Built by [@tedx\_ai](https://x.com/tedx_ai),
BrowserTools gives AI code editors and agents the ability to monitor and interact with your web browser for highly effective debugging and a more seamless developer experience - all in a safe and secure manner.
With this MCP server tool, you can enable AI code editors and agents to have access to:
* Console logs and errors
* XHR network requests/responses
* Screenshot capabilities w/ optional auto-paste into Cursor
* Currently selected DOM elements
* Run SEO, Performance & Code Quality Scans via Lighthouse
* Run a NextJS-specific SEO audit
* Enter into "Debugger Mode" which uses many tools + prompts to fix bugs
* Enter into "Audit Mode" to perform a comprehensive web app audit
That way, you can simply tell Cursor or any AI code editor with MCP integrations:
"This isn't working... enter debugger mode!"
"Can you edit the currently selected element to do x, y and z?"
"I need to improve SEO and performance... enter audit mode"
"Can you check console and network logs to see what went wrong?"
"Something doesn't look right in the UI. Can you take a screenshot?"
***
## Requirements
* NodeJS installed on your machine
* Google Chrome or a Chromium-based Browser
* MCP Client Application (Cursor, Windsurf, RooCode, Cline, Continue, Zed, Claude Desktop)
**Note**: Model Context Protocol (MCP) is specific to Anthropic models. When
using an editor like Cursor, make sure to enable composer agent with Claude
3.5 Sonnet selected as the model.
***
## Installation
1. **Download the Chrome Extension**: The official chrome extension is pending approval on the Google extension marketplace. For now, you can [click here to download the extension](https://github.com/AgentDeskAI/browser-tools-mcp/releases/download/v1.2.0/BrowserTools-1.2.0-extension.zip) or clone the repo below and find the extension within the chrome-extension directory:
> **1a.** Optionally download from Github
```bash https theme={null}
git clone https://github.com/AgentDeskAI/browser-tools-mcp.git
```
```bash ssh theme={null}
git clone git@github.com:AgentDeskAI/browser-tools-mcp.git
```
```bash github-cli theme={null}
gh repo clone AgentDeskAI/browser-tools-mcp
```
***
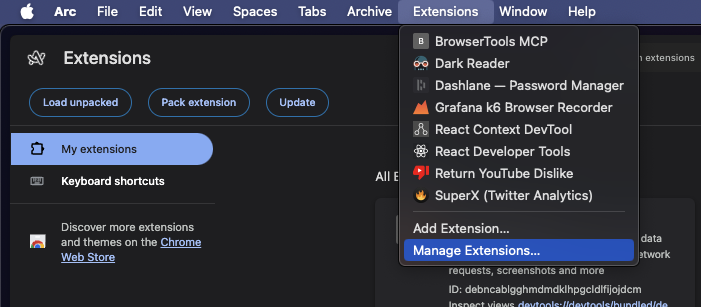
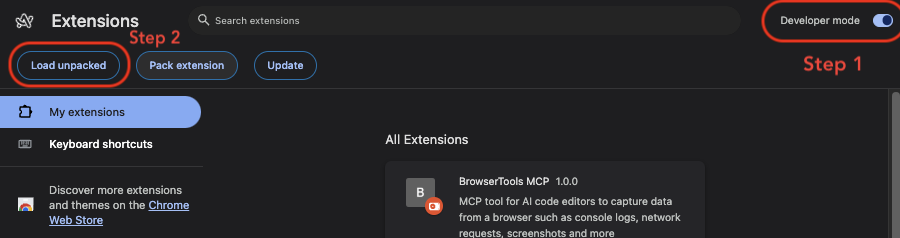
2. **Install the Chrome Extension**: Open the 'Manage Extensions' window, enable 'Developer Mode' and then load the unpacked extension:
> **2a.** Open 'Manage Extensions'
 > **2b.** Enable 'Developer Mode' and click 'Load unpacked'
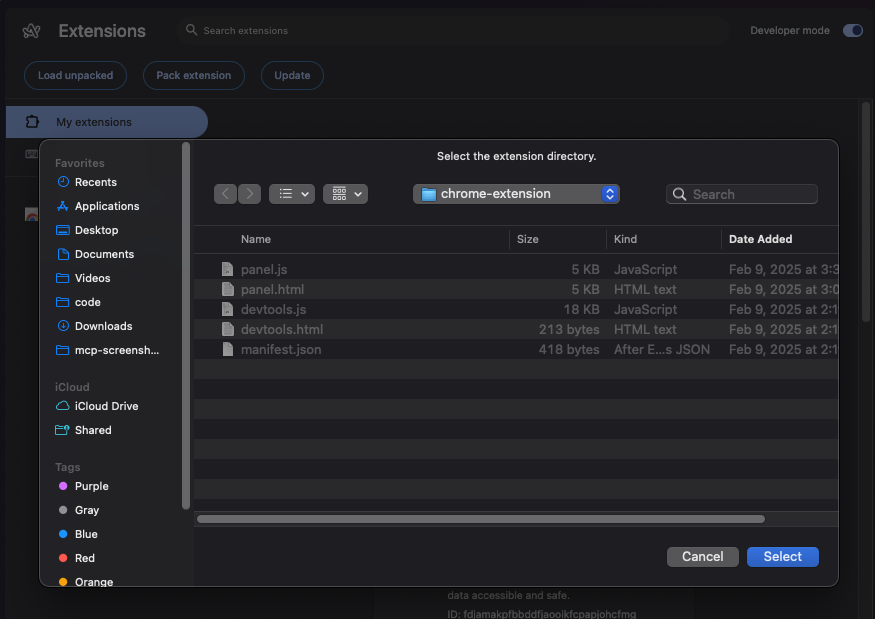
 > **2c.** Navigate to the chrome extension folder downloaded earlier, make sure
> it's unzipped and click 'Select'. You should see **BrowserToolsMCP** in your
> list of extensions now!
> **2c.** Navigate to the chrome extension folder downloaded earlier, make sure
> it's unzipped and click 'Select'. You should see **BrowserToolsMCP** in your
> list of extensions now!
 ***
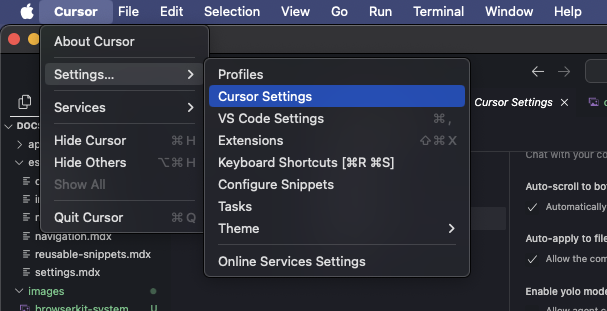
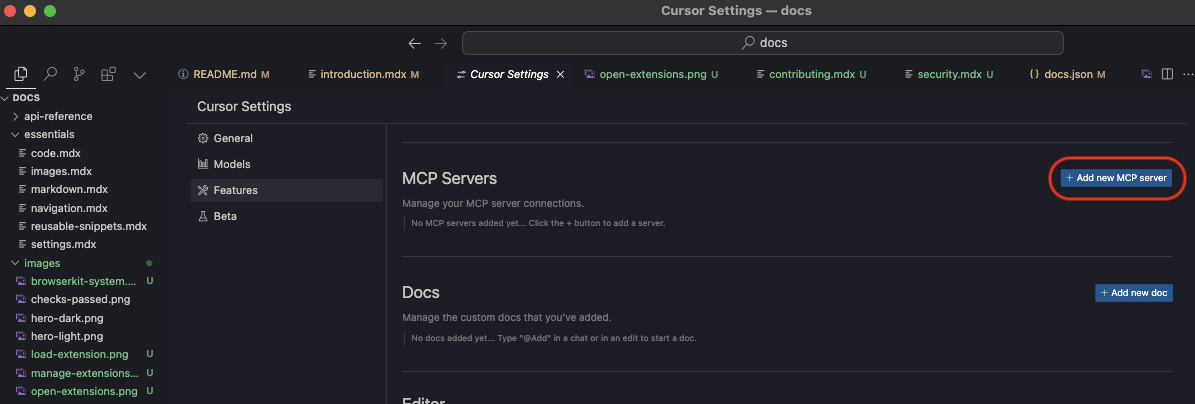
3. **Setup BrowserTools MCP Tool**: Setup BrowserTools MCP server in your favorite MCP client. Here's how to set this up inside of Cursor:
> **3a.** Go to your 'Cursor Settings'
{" "}
{" "}
{" "}
{" "}
{" "}
***
3. **Setup BrowserTools MCP Tool**: Setup BrowserTools MCP server in your favorite MCP client. Here's how to set this up inside of Cursor:
> **3a.** Go to your 'Cursor Settings'
{" "}
{" "}
{" "}
{" "}
{" "}
 > **3b.** Go to Features, scroll down to MCP Servers and click on 'Add new MCP
> server'
{" "}
{" "}
{" "}
{" "}
{" "}
> **3b.** Go to Features, scroll down to MCP Servers and click on 'Add new MCP
> server'
{" "}
{" "}
{" "}
{" "}
{" "}
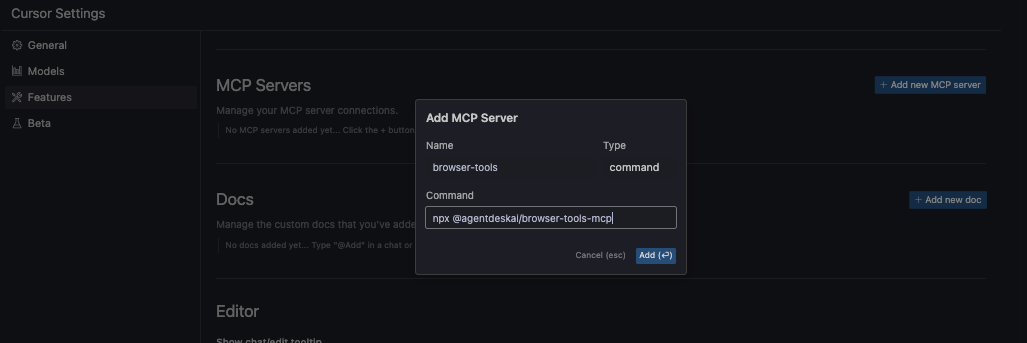
 > **3c.** Give it a unique name (browser-tools), set type to 'command' and set
> command to:
```bash MacOS theme={null}
npx @agentdeskai/browser-tools-mcp@1.2.0
```
```bash Windows NPX theme={null}
cmd /c npx -y @agentdeskai/browser-tools-mcp@1.2.0
```
```json Windows NPX via .cursor/mcp.json theme={null}
{
"mcpServers": {
"browser-tools": {
"command": "wsl",
"args": [
"bash",
"-c",
"cmd /c npx -y @agentdeskai/browser-tools-mcp@1.2.0"
],
"enabled": true
}
}
}
```
```json Windows NPX via .cursor/mcp.json (if path not set) theme={null}
{
"mcpServers": {
"browser-tools": {
"command": "wsl",
"args": [
"bash",
"-c",
"'/home/[username]/.nvm/versions/node/v20.18.0/bin/npx @agentdeskai/browser-tools-mcp@1.2.0'"
],
"enabled": true
}
}
}
```
If using NPX on Windows, use this command to find the path to NPX:
```bash theme={null}
which npx
```
{" "}
{" "}
> **3c.** Give it a unique name (browser-tools), set type to 'command' and set
> command to:
```bash MacOS theme={null}
npx @agentdeskai/browser-tools-mcp@1.2.0
```
```bash Windows NPX theme={null}
cmd /c npx -y @agentdeskai/browser-tools-mcp@1.2.0
```
```json Windows NPX via .cursor/mcp.json theme={null}
{
"mcpServers": {
"browser-tools": {
"command": "wsl",
"args": [
"bash",
"-c",
"cmd /c npx -y @agentdeskai/browser-tools-mcp@1.2.0"
],
"enabled": true
}
}
}
```
```json Windows NPX via .cursor/mcp.json (if path not set) theme={null}
{
"mcpServers": {
"browser-tools": {
"command": "wsl",
"args": [
"bash",
"-c",
"'/home/[username]/.nvm/versions/node/v20.18.0/bin/npx @agentdeskai/browser-tools-mcp@1.2.0'"
],
"enabled": true
}
}
}
```
If using NPX on Windows, use this command to find the path to NPX:
```bash theme={null}
which npx
```
{" "}
{" "}
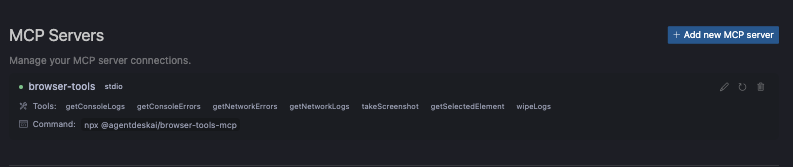
 > **3d.** Confirm that the MCP server has been connected. You should see all the tools listed and a green circle next to the tool name.
Wait a few seconds or click on the refresh button a few times if it does not register. If it still won't register make sure you entered the right command.
{" "}
{" "}
> **3d.** Confirm that the MCP server has been connected. You should see all the tools listed and a green circle next to the tool name.
Wait a few seconds or click on the refresh button a few times if it does not register. If it still won't register make sure you entered the right command.
{" "}
{" "}
 For more on this, check out the docs for these MCP clients:
* [Cursor](https://docs.cursor.com/context/model-context-protocol)
* [Windsurf](https://docs.codeium.com/windsurf/mcp)
* [Zed](https://zed.dev/docs/assistant/model-context-protocol)
* [RooCode](https://docs.roocode.com/advanced-usage/mcp/)
* [Cline](https://github.com/cline/cline?tab=readme-ov-file#add-a-tool-that)
* [Claude Desktop](https://modelcontextprotocol.io/quickstart/user)
* [LibreChat](https://www.librechat.ai/docs/configuration/librechat_yaml/object_structure/mcp_servers)
***
4. **Run the BrowserTools Server**: Aggregates logs from the chrome extension and sets up websockets for screenshot capture. Run this from your terminal within any directory:
```bash npm theme={null}
npx @agentdeskai/browser-tools-server@1.2.0
```
**Note**: The browser-tools-server runs on port 3025. Make sure to terminate
any processes running on this port. In a future release, we will handle this
gracefully.
***
5. **Open the Chrome Developer Console**: Right click on any web page and click
'Inspect' to open the Chrome dev tools. Once open, logs will be accessible to the
MCP client.
For more on this, check out the docs for these MCP clients:
* [Cursor](https://docs.cursor.com/context/model-context-protocol)
* [Windsurf](https://docs.codeium.com/windsurf/mcp)
* [Zed](https://zed.dev/docs/assistant/model-context-protocol)
* [RooCode](https://docs.roocode.com/advanced-usage/mcp/)
* [Cline](https://github.com/cline/cline?tab=readme-ov-file#add-a-tool-that)
* [Claude Desktop](https://modelcontextprotocol.io/quickstart/user)
* [LibreChat](https://www.librechat.ai/docs/configuration/librechat_yaml/object_structure/mcp_servers)
***
4. **Run the BrowserTools Server**: Aggregates logs from the chrome extension and sets up websockets for screenshot capture. Run this from your terminal within any directory:
```bash npm theme={null}
npx @agentdeskai/browser-tools-server@1.2.0
```
**Note**: The browser-tools-server runs on port 3025. Make sure to terminate
any processes running on this port. In a future release, we will handle this
gracefully.
***
5. **Open the Chrome Developer Console**: Right click on any web page and click
'Inspect' to open the Chrome dev tools. Once open, logs will be accessible to the
MCP client.
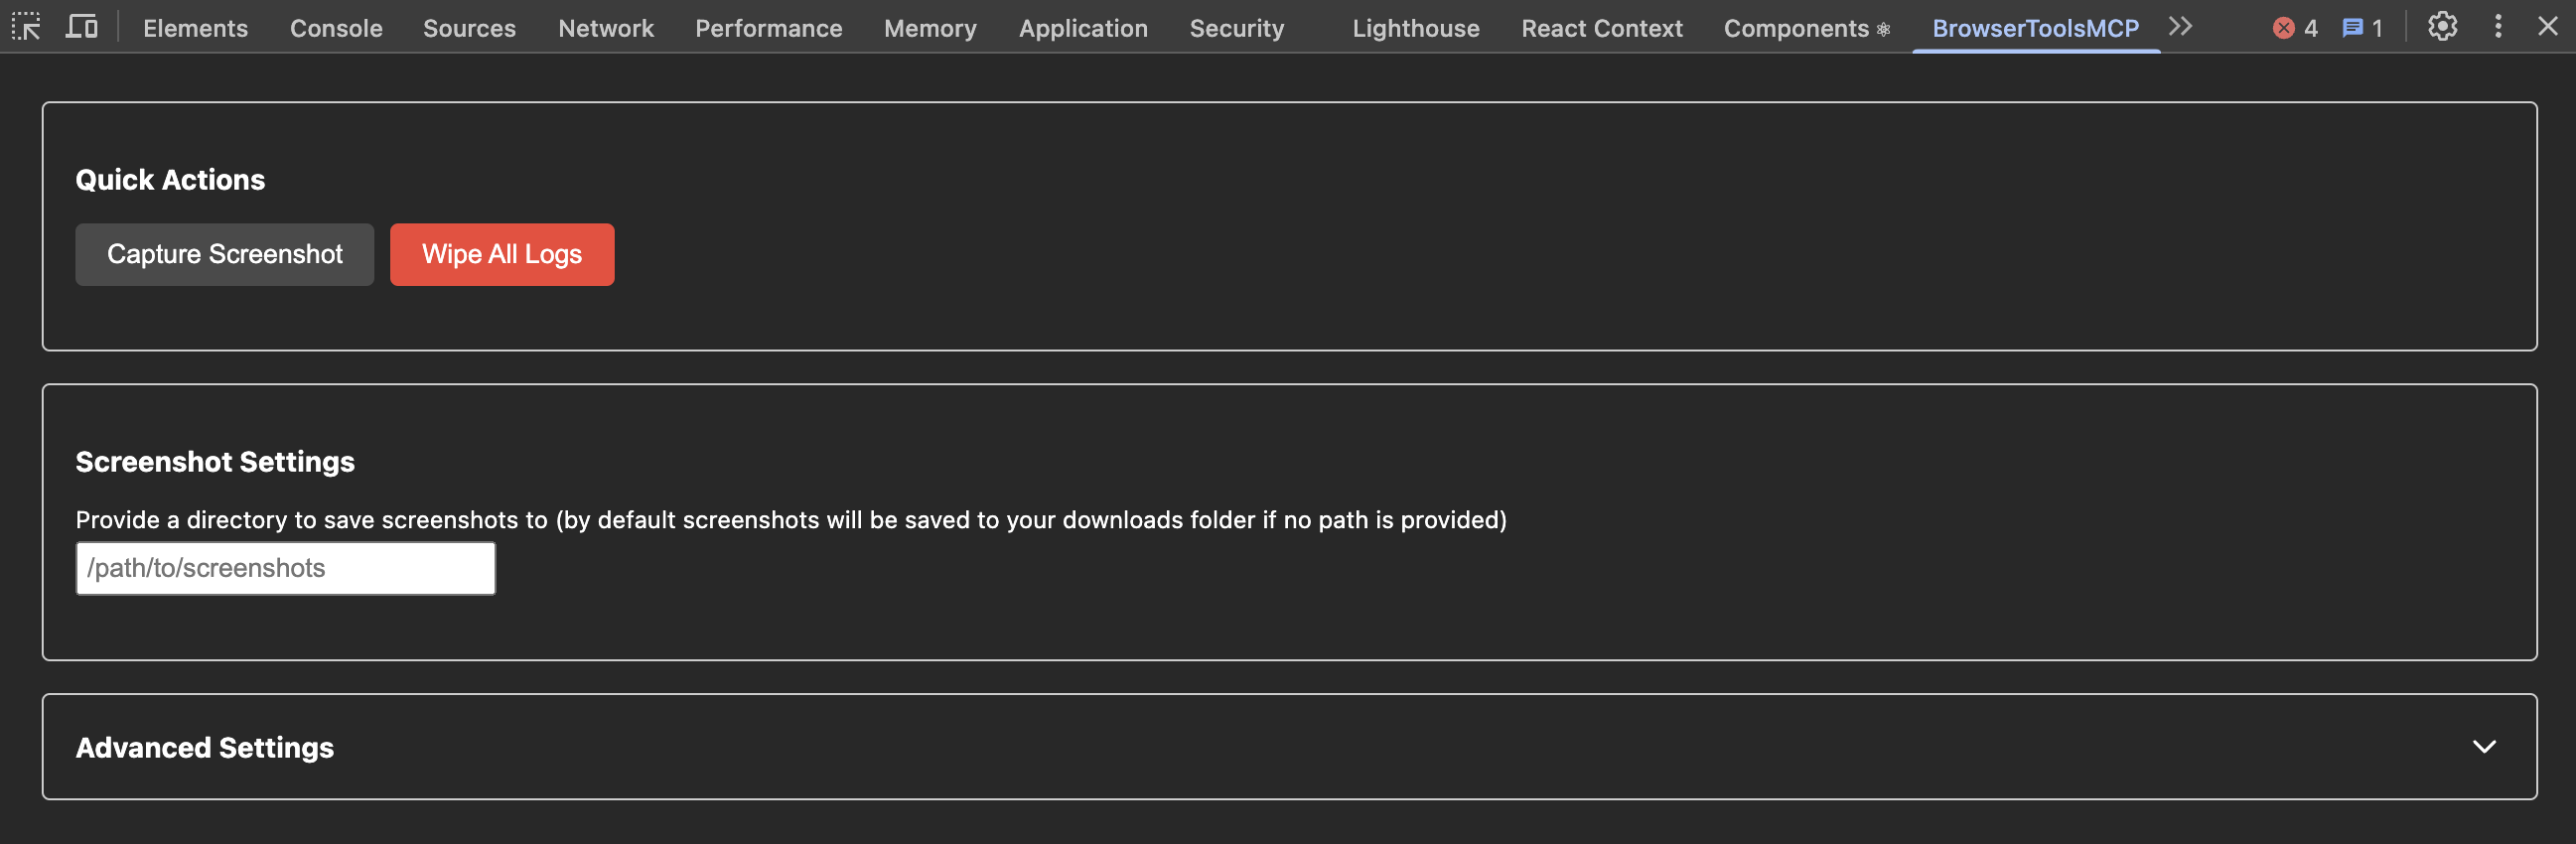 You can navigate to the BrowserTools panel to:
* Manually capture a screenshot
* Define a path to save screenshots to (defaults to: `Downloads/mcp-screenshots`)
* Wipe all saved logs
* Modify logging size limits / truncation
**Note**: Logs will be wiped from the server everytime you refresh the page.
You can manually wipe the logs by clicking the 'Wipe Logs' button in the
BrowserTools panel.
***
**Congratulations! You've successfully installed and configured BrowserTools 🎉**
Check out our [Quickstart Guide](/quickstart) to learn how to interact with your new MCP tool!
You can navigate to the BrowserTools panel to:
* Manually capture a screenshot
* Define a path to save screenshots to (defaults to: `Downloads/mcp-screenshots`)
* Wipe all saved logs
* Modify logging size limits / truncation
**Note**: Logs will be wiped from the server everytime you refresh the page.
You can manually wipe the logs by clicking the 'Wipe Logs' button in the
BrowserTools panel.
***
**Congratulations! You've successfully installed and configured BrowserTools 🎉**
Check out our [Quickstart Guide](/quickstart) to learn how to interact with your new MCP tool!
 ***
## Troubleshooting
Sometimes things go wrong but we're here to help! Here are few common gotchas and steps you can take to get BrowserTools up and running:
1. Check to see if you've installed the MCP server into Cursor correctly
2. Make sure you're running the **@agentdeskai/browser-tools-server\@1.2.0** command in a new terminal
3. Make sure you've installed the chrome extension and opened chrome dev tools in the tab you want to capture logs from
4. If none of this works double-check the common gotchas below
And if you're STILL stuck...
1. Run this command in a new terminal to monitor the Cursor MCP logs:
```bash theme={null}
tail -n 20 -F ~/Library/Application\ Support/Cursor/**/*MCP.log
```
2. Take a screenshot of those logs, a screenshot of the node server logs from browser-tools-server and if possible - go into the manage extensions window in chrome and click on an error button if present in the extension we installed earlier to capture a screenshot of that too
3. Contact [@tedx\_ai](https://x.com/tedx_ai) on X or add an issue to the [Github repo](https://github.com/AgentDeskAI/browser-tools-mcp) with all the requested details and we'll get back to you as soon as possible!
### Common Issues & Errors
Cursor and some other MCP clients may not always fetch the correct version of the MCP server. Make sure to use `npx @agentdeskai/browser-tools-mcp@1.2.0` instead to explicitly use the latest working version.
Screenshots will be default be saved to your downloads folders within a `/mcp-screenshots` directory.
Make sure to check there for the screenshots. Otherwise, you can add a path to save screenshots to in the
BrowserToolsMCP dev tools panel.
We suggest creating a screenshots folder in your current project, right click on the folder and click on 'copy path'. Then paste that into the dev tools panel and press enter.
Make sure to open the chrome dev tools console in the browser tab that you want to capture logs from.
Close down any other tabs that have the chrome dev tools open. BrowserToolsMCP will capture logs across many tabs.
Anytime you refresh the page or restart the node process running the browser-tool-mcp server, your logs will be wiped.
You might have chrome dev tools / the inspector window open in other tabs! Closing those panels in each tab, then refreshing the tab of the project you're working on should fix this!
Contact [@tedx\_ai](https://x.com/tedx_ai) or add an issue to the [Github repo](https://github.com/AgentDeskAI/browser-tools-mcp).
***
## Troubleshooting
Sometimes things go wrong but we're here to help! Here are few common gotchas and steps you can take to get BrowserTools up and running:
1. Check to see if you've installed the MCP server into Cursor correctly
2. Make sure you're running the **@agentdeskai/browser-tools-server\@1.2.0** command in a new terminal
3. Make sure you've installed the chrome extension and opened chrome dev tools in the tab you want to capture logs from
4. If none of this works double-check the common gotchas below
And if you're STILL stuck...
1. Run this command in a new terminal to monitor the Cursor MCP logs:
```bash theme={null}
tail -n 20 -F ~/Library/Application\ Support/Cursor/**/*MCP.log
```
2. Take a screenshot of those logs, a screenshot of the node server logs from browser-tools-server and if possible - go into the manage extensions window in chrome and click on an error button if present in the extension we installed earlier to capture a screenshot of that too
3. Contact [@tedx\_ai](https://x.com/tedx_ai) on X or add an issue to the [Github repo](https://github.com/AgentDeskAI/browser-tools-mcp) with all the requested details and we'll get back to you as soon as possible!
### Common Issues & Errors
Cursor and some other MCP clients may not always fetch the correct version of the MCP server. Make sure to use `npx @agentdeskai/browser-tools-mcp@1.2.0` instead to explicitly use the latest working version.
Screenshots will be default be saved to your downloads folders within a `/mcp-screenshots` directory.
Make sure to check there for the screenshots. Otherwise, you can add a path to save screenshots to in the
BrowserToolsMCP dev tools panel.
We suggest creating a screenshots folder in your current project, right click on the folder and click on 'copy path'. Then paste that into the dev tools panel and press enter.
Make sure to open the chrome dev tools console in the browser tab that you want to capture logs from.
Close down any other tabs that have the chrome dev tools open. BrowserToolsMCP will capture logs across many tabs.
Anytime you refresh the page or restart the node process running the browser-tool-mcp server, your logs will be wiped.
You might have chrome dev tools / the inspector window open in other tabs! Closing those panels in each tab, then refreshing the tab of the project you're working on should fix this!
Contact [@tedx\_ai](https://x.com/tedx_ai) or add an issue to the [Github repo](https://github.com/AgentDeskAI/browser-tools-mcp).